
So you’ve finally finished writing that blog post you’ve been sitting on for weeks. Good for you, honestly. But now you’re staring at your screen wondering what to actually do with it. If you’ve landed on the Uploadblog homepage wondering whether this platform is the right place to publish, you’re not alone — a lot of writers hit this exact wall. The writing part is done, but the publishing part feels like a whole different beast, and nobody really teaches you that bit.
This guide walks you through everything, starting right from the Uploadblog homepage itself, all the way to hitting publish and tracking how your post performs afterward. We’ll also dig into a few things most guides skip entirely — like how content ownership works, what the platform’s technical limits actually are, and how to grow beyond a single post. Let’s get into it.
What Is Uploadblog.com, And Why Should You Care
Uploadblog.com is a no-code blogging platform built for people who just want to publish content without dealing with hosting, plugins, or web development headaches.
It’s basically the middle ground between a complicated CMS (like a self-hosted WordPress setup that needs constant maintenance) and a barebones note app that nobody else can read. You write, you format, you hit publish — that’s the whole pitch. No domain purchase needed, no server configuration, none of that stuff that scares off first-time bloggers.
What makes the platform genuinely useful, in my opinion anyway, is that it doesn’t gatekeep simplicity behind a paywall. The core blogging tools — the blog post editor, basic formatting, image uploads — are accessible whether you’re a complete beginner or someone who’s been blogging for years on other platforms and just wants something faster.
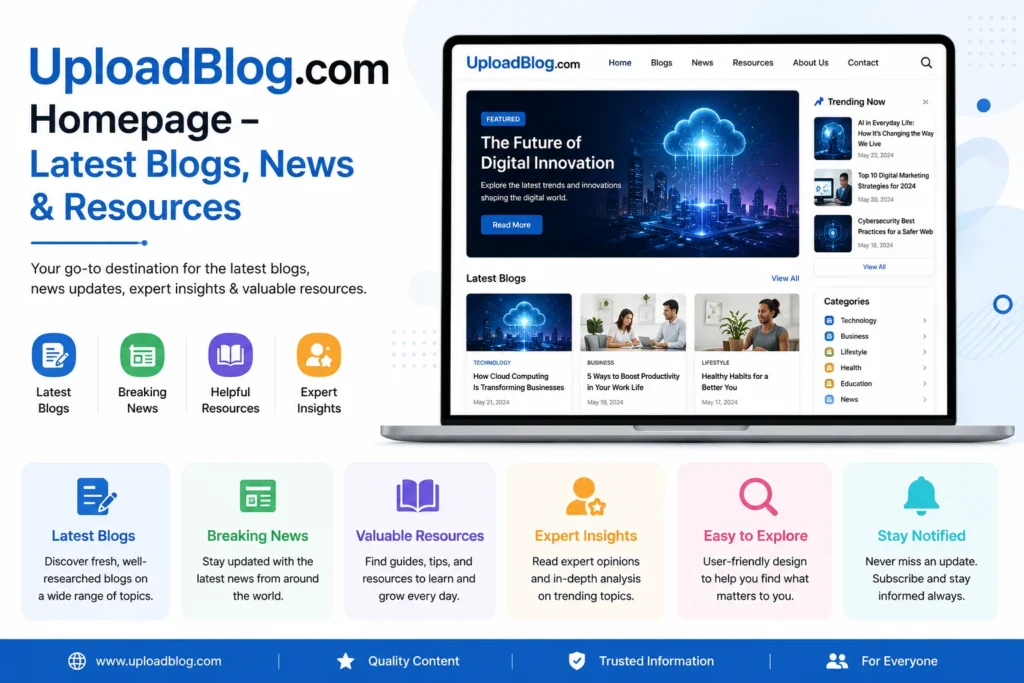
Exploring the Uploadblog Homepage Before You Get Started
The Uploadblog homepage is your starting point for everything, so it’s worth spending two minutes here before you dive in.
When you land on the homepage, you’ll typically notice a clean layout with navigation options pointing toward Sign Up, Login, and sometimes a “Browse Blogs” or “Explore” section where you can see what other creators have published. This isn’t just decoration — browsing a few live posts on the Uploadblog homepage actually gives you a feel for formatting standards, average post length, and the kind of content that performs well on the platform.
A few things worth checking on the homepage before you register:
- The Sign Up button location (usually top right or center of the page)
- Any featured or trending posts, which give you a benchmark for quality
- Footer links to help docs, terms of service, or a FAQ page
- Platform branding cues that tell you what niches or content types the platform leans toward
It sounds like a small step, but skipping it is one reason new users feel lost once they’re inside the dashboard.
You may also like to read BigXthaPlug Height Revealed
Discover more about: Hunxho Age Revealed
What You Need Before Uploading a Blog
Don’t open the editor without these things ready — trust me, half-prepping leads to messy, rushed posts.
Before you even touch the upload process, gather the following:
- A finished draft — fully written, proofread, and edited. Not “almost done.” Done.
- A clear, keyword-rich working title that naturally includes your primary keyword.
- A featured image, ideally sized around 1200 x 630px so it displays cleanly across devices.
- A meta description between 150–160 characters summarizing the post.
- A short list of relevant tags or categories.
- Your login credentials, so you’re not fumbling for a password mid-upload.
Having all this lined up beforehand turns the upload process from a 40-minute scramble into a 10-minute task. Big difference, especially if you’re publishing regularly.
How to Create an Account on the Uploadblog Homepage
Creating an account takes less time than making a cup of coffee, more or less.
- Visit the Uploadblog homepage and click Sign Up or Register.
- Fill in your name, email address, and a password.
- Check your inbox for a confirmation email and click the verification link (don’t skip this — unverified accounts often have restricted access).
- Once logged in, head to your profile settings and add a display name, short profile bio, and a profile picture if the option’s there.
A complete profile honestly matters more than people think. Readers tend to trust posts attached to a real, filled-out profile over an anonymous-looking one, and it signals to the platform (and to search engines, indirectly) that this is an active, credible account.
How to Upload a Blog on Website Using Uploadblog.com (Step-by-Step)
Here’s the actual upload process, broken into steps you can follow in order.
- Log in using your registered email and password — this takes you straight to your dashboard.
- Click New Post or Create Blog to open the editor.
- Enter your blog title in the title field. Make it specific, make it compelling, because it’s the first thing both readers and search crawlers see.
- Write your content directly in the editor or paste a finished draft. Use formatting tools like bold, italics, and underline where they actually add value (not everywhere — that gets messy fast).
- Break long paragraphs into shorter chunks. Add H2 and H3 subheadings, bullet points, and maybe a table or two if your content calls for it.
- Add your SEO elements: meta description, primary keyword in the first paragraph and at least one subheading, plus a natural mention or two throughout the body.
- Upload your featured image and add descriptive alt text that includes your keyword where it fits naturally.
- Select a category and add your tags.
- Preview the post. Check formatting, image placement, mobile view — anything that looks off.
- Click Publish.
That’s it. Once you hit publish, the post is live and accessible to anyone with the link, no waiting period or approval queue in most cases.
You may also like to read ProgramGeeks Social Media
Discover more about: GlaadVoice com Explained
You may also like to know about Kathleen Nimmo Lynch
SEO Tips to Optimize Your Blog Before You Hit Publish
A well-written post that’s poorly optimized still struggles to get found, so don’t skip this part.
Optimize Keyword Placement
Keyword placement directly improves search engine rankings — that’s not just a guess, it’s basically how on-page SEO works. Your primary keyword should show up in the title, somewhere in the first 100 words, in at least one subheading, and naturally a few times through the body. Don’t force it though. If it reads awkward, rewrite the sentence.
Improve Readability
Short paragraphs, active voice, simple sentences — that’s the formula. If you can cut a 20-word sentence down to 10 without losing meaning, do it. Tools like Hemingway Editor can flag overly dense passages before you publish.
Use Proper Heading Structure
This one’s underrated. Heading structure (H2 and H3 tags) enhances both readability and scannability, which matters because most readers skim before committing to a full read. It also helps search engines understand your content hierarchy.
Compress Your Images
Image compression reduces page load time, plain and simple. Large, uncompressed image files are one of the most common reasons blog pages load slowly, and slow pages lose readers within seconds. Compress before you upload, not after.
Guest vs. Registered User: What’s the Real Difference
Registering an account unlocks meaningfully more than just “extra features” — it’s the difference between a temporary post and an actual content presence.
| Feature | Guest/Unregistered User | Registered User |
| Publish blog posts | Limited or unavailable | Full access |
| Add featured images | Restricted | Available |
| SEO meta fields | Not available | Available |
| Access to post analytics | No | Yes |
| Edit published posts | No | Yes |
| Build a profile page | No | Yes |
In short, a registered user account unlocks full publishing access — analytics, editing rights, SEO controls, the works. Two minutes of signup time buys you a lot of long-term flexibility.
What the Competitors Don’t Tell You: Monetization, Ownership, and Platform Mechanics
Most guides stop at “click publish” and call it done. That’s not the full picture though, especially if you’re thinking about blogging as more than a one-off hobby.
Can You Monetize a Blog on Uploadblog.com?
This depends largely on your account tier and the platform’s current monetization program, which can change over time, so it’s worth checking the help section directly before assuming anything. Generally, platforms like this offer monetization through either ad-revenue sharing, affiliate link support within posts, or eventual options to connect a custom domain that you fully control for branding and revenue purposes.
Does Your Content Live on a Subdomain or Custom URL?
By default, most hosted blogging platforms publish your content under a shared domain structure (something like uploadblog.com/yourusername/post-title) rather than your own custom domain. This matters for two reasons: branding and SEO authority. A shared domain means you benefit somewhat from the platform’s existing domain authority, but you don’t fully “own” the URL the way you would with a self-hosted site. If long-term brand building matters to you, check whether the platform offers a custom domain mapping option as you grow.
What Are the Technical Limits You Should Know About
A few practical details rarely get covered:
- File formats: Most platforms accept JPG, PNG, and WebP for images; always check before uploading something unusual like a TIFF file.
- Word count and character limits: There’s typically no hard cap on word count, though extremely long posts (5000+ words) may need to be split into a series for better readability.
- Draft autosave: Check whether the editor autosaves drafts periodically — losing an hour of writing to a browser crash is genuinely painful.
- Multi-author support: If you’re running a team blog, confirm whether multiple contributors can be added under one account or whether each person needs a separate login.
- Scheduled publishing: Some platforms allow you to schedule a post for a future date/time rather than publishing instantly, which is a useful feature for maintaining a content marketing strategy and a consistent publishing schedule.
These details rarely make it into surface-level tutorials, but they’re exactly the kind of thing that trips people up three months into blogging, not on day one.
Common Mistakes to Avoid When Uploading a Blog
A few avoidable slip-ups can quietly undercut an otherwise solid post, so watch out for these.
- Skipping proofreading. Once a post is live, typos undermine credibility fast. Proofread in preview mode before you publish, not after.
- Ignoring basic SEO. No meta description, no keyword placement, no alt text — your post simply won’t get discovered, no matter how good the writing is.
- Messy formatting. Content that looks fine in a Word doc can fall apart inside a web editor. Always check formatting inside the platform itself.
- Skipping the preview step. What looks right in the editor doesn’t always translate to the live view, especially on mobile screens.
What to Do After Publishing Your Blog
Publishing isn’t the finish line — it’s closer to the starting gun, if anything.
Once your post goes live, share the URL across your social channels, relevant communities, and any email list you maintain. Forum posting and guest contributions on other sites can also widen your reach beyond your own audience. From there, keep an eye on your post analytics — page views, average time on page, traffic sources — because these numbers tell you what’s actually resonating versus what’s just sitting there. And if readers leave comments, respond to them; it builds community and signals genuine engagement, both to readers and indirectly to the platform itself.
Lastly, stick to a consistent publishing rhythm. One post won’t move the needle much on its own, but a steady cadence — weekly, biweekly, whatever’s realistic for you — compounds into real audience trust over time.
Final Thoughts
Publishing your first blog post really doesn’t require a background in web development or any technical wizardry. Starting from the Uploadblog homepage, through account setup, drafting, SEO optimization, and finally hitting publish, the whole process is built to be approachable for writers at any level. The gap between “I wrote something” and “people are actually reading it” is smaller than it feels — you just need a clear map, and that’s exactly what this guide aimed to give you.
FAQs About the Uploadblog Homepage and Blog Publishing
Q. Do I need to start from the Uploadblog homepage every time I want to publish? No, only for your first login or signup. After that, bookmark your dashboard URL directly. The homepage is mainly useful for new users browsing the platform or registering an account for the first time.
Q. Is there a cost to publish through Uploadblog.com? Basic publishing features are typically free once you register. Some advanced features, like custom domain mapping or deeper analytics, may require a paid tier depending on the platform’s current pricing structure.
Q. Can guest users publish without registering? Guest access is usually limited or unavailable for actual publishing. Registering takes a couple of minutes and unlocks full access to SEO fields, analytics, image uploads, and post editing.
Q. How long should a blog post be for good SEO results? Most SEO professionals recommend at least 1000 words, with 1500–2000 words often performing best in search rankings. Length alone isn’t everything though — quality, structure, and keyword placement matter just as much.